In my years as a dirtbag, I have come up with a few nice tricks. Some of them I learned from others, and some I made up myself. In the interest of passing a few rest days and passing a along some knowledge that would have been useful to me in the past, I have made up this page. I am not saying that this is the only way, or even the best way, but these things have worked for me. If there is a cheaper, easier, better way to do these things or anything else useful, I would like to know about it. So, in no particular order, here they are:
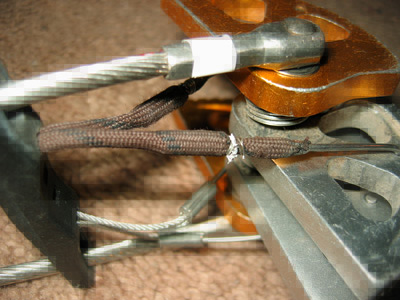
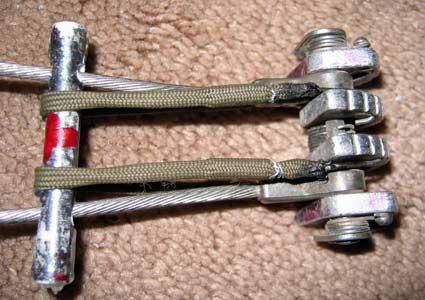
I finally snapped a trigger wire on a cam on a climb (a rather traumatic event, as it was a sort of desperate location, but I managed to place it by closing the cam with my arm and wedging it into the crack), so I needed to fix it. I presumed I'd be using a trigger wire kit and cutting and swaging cable. In Yosemite I was told there were no trigger kits for that model (trango). So I got creative on a rest day.
materials needed: twist tie, cam with busted trigger wire, shoelace or other tubular thin string sort of material, pliers or other wire cutting device, lighter or other source of heat.
Some hints: Use non-stretchy laces that are made of something like nylon that will melt. I pulled the core out of some parachute cord for one of my cams. For my second cam, there was no trigger at all (I bootied it). So I made a trigger out of an old pen by drilling holes in it. I cut slits outside the holes and wedged them open to get it onto the stems. Then I used a hot melt glue gun to glue it all back together and glue the trigger strings over the trigger.
I don't know how durable this will be. I did the Trango cam this spring, and it has been up at least 10 climbs with at least 5 placements with no problems. Since this is not a really structural part of the cam, I am not too worried.
| |
|---|
 |
|---|
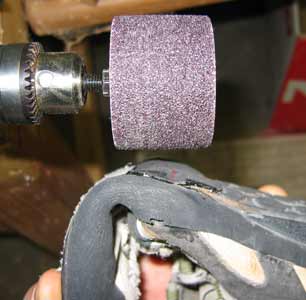
Warning: home resoling is a little more involved and takes longer, and it is quite possible to completely destroy your shoes attempting to do this.
 |
|---|
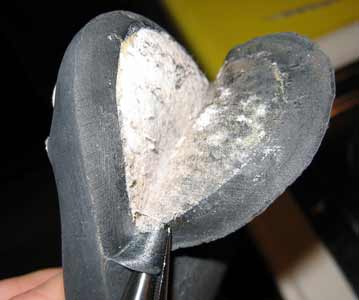
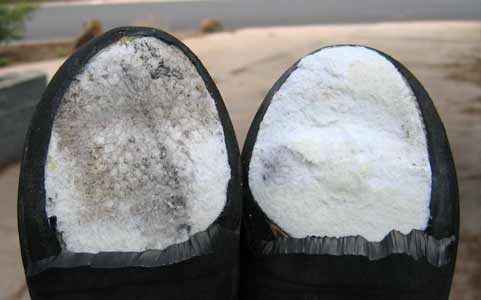
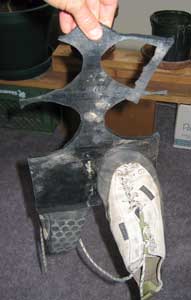
If you can resole before your rands are damaged, that is a lot easier. Rand patches are a pain and if not done correctly can alter the shape of the toes. The pair of huecos I am working on here were my "comfy shoes" with an upturned toe, so there was no rand damage. Just a hole through under the big toe, and very thin sole in that general area of both shoes. Cleverly I didn't get a "before" picture.
The first step is to remove the damaged sole. In some cases (especially slippers) it may be easier to grind the sole down thin. To loosen the glue I waved the shoes a few inches above the stove burner on low. A heat gun works the best, followed by an electric stove, and then a gas stove. Then I used a pair of pliers to grab the sole and start peeling it back. By twisting the pliers you can roll the sole off of the rest of the shoe. If it isn't coming off, heat it more. Also watch out that the edge of the rand rolled under the sole is staying with the shoe, and not ripping off onto the old sole. It might be best to mark how far back you plan to remove the sole with a sharpie so you don't take too much off. Then cut the sole at an angle with a very sharp blade.
If the rand stayed in place and the midsole is in good shape, then grind the cut edge of the sole so that it is a smooth edge. Otherwise, glue the bits of rand that are loose back down. In the pair of huecos here, there isn't a lot of rand wrapped around under the sole, and the midsoles are pretty trashed (maybe the glacier travel didn't help here). I used seam grip or maybe freesole to try to provide a better surface where the midsole was damaged and along the edges of the rand.
 |
|---|
 |
|---|
 |
|---|
Before you bring the sole into contact with the shoe, heat up the surfaces and the glue. Sticking it in hot sun works, so do the methods mentioned above for loosening the glue. Once the 2 surfaces touch, they can't be moved, so do it right the first time. I usually start closest to the heel and sort of roll them together towards the toe. Then press them together very hard. I hammer it. I have also parked my truck on them, but I didn't notice any real benefit from this. Then let it sit a day or so for the bond to get stronger.
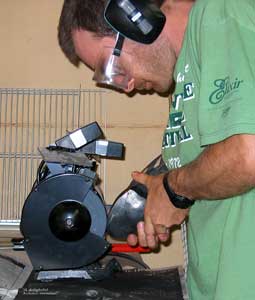
Next up is the trimming. Use a very sharp blade and cut around the sole as close to the final edge as you can. If you draw the blade across the rubber while pulling the gap apart that helps. I hold the shoe in my feet and use one hand to pull the edge back while I am cutting with the other hand. After the shoes have been trimmed it is time for grinding. This is where you can make it look like a nice job if you are careful, or a butcher job if you aren't. Slowly and carefully grind the edge back to the desired finished contour. Don't grind too much in one location at one time or it will get too hot and loosen the glue. I usually work my way around one shoe, then go to the other to let the first cool. Carefully using the edge of the grinder and bending the shoe back can help keep you from destroying the rand. The glued joint sticks better if you grind it a bit, but you also remove some of the rand, so it is a delicate balance. Grinding the back edge of the joint takes a long time, and it helps to switch shoes and bend the sole and grind towards the edge of the shoe from the middle.
 |
|---|
 |
|---|
That's all there is to it, unless you need to do a rand patch.
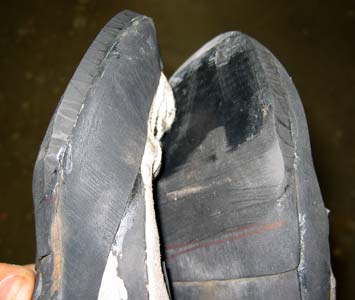
The rand patch goes on after the sole is removed. For a rand patch you need some thin rubber - about 1 to 1.5 mm. I usually end up grinding or cutting the piece of sole that came off originally. It needs to be thin enough to bend around the toe, or you will make a Frankenstein boot. Once it is thin enough, you need to start wrapping it around the toe and figuring out how you are going to fit it to patch the damaged rand. I usually place it and then use a pen to mark the edge. Then scuff up and clean both the toe and the patch, put on a thin layer of glue, let it dry, heat up both sides, and stick it on. Wrap it tightly so it makes the compound curves with the overlap on the sole. This needs to be cut off. Then hammer it in place. After it cures, I grind the bottom of the new patch to leave an edge and a smooth bottom to the shoe. Then put on the sole as above.
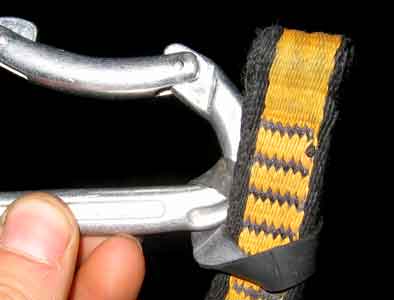
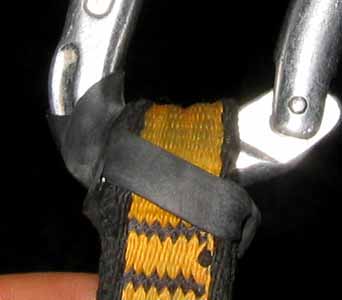
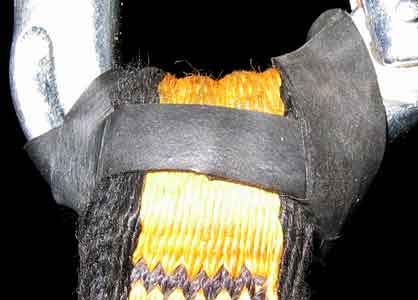
It can be mighty frustrating trying to make a desperate clip when your bottom biner has inverted. Petzl sells slick rubber doodads that hold the biner on the end of the draw, but they are buck each or something. I used fat rubber bands from broccoli, but they tended to rot in a year or so, so now I use bands cut from bicycle inner tubes.
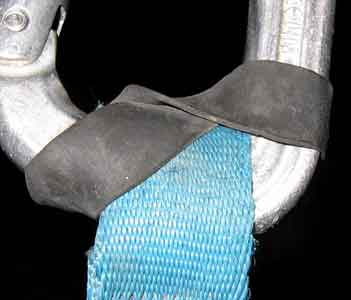
Get an old bicycle inner tube from a mountain bike, and start cutting it like calamari about a halfcentimeter thick. Then put it on the biner by the hinge Then twist it and stick the draw through it and onto the biner. Then twist the band again and thread it onto the biner on the spine side. This takes some stretching. Look at the pictures for clarification. An alternative method is to just put the band on the biner (with the draw in place), twist it and hook it on again, and then work it down to the draw (see alternative picture).
 |
|---|
 |
|---|
 |
|---|
 |
|---|
One advantage of using this method is if you need to make a stick clip, you can use any old found stick, and thread the end through the band. Then use a short twig to prop the gate open, and stick the first bolt - you don't even need tape.
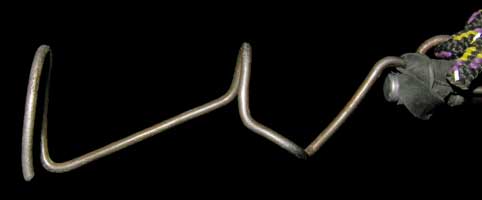
Get a thick wire coat hanger and 2 pairs of pliers and some of your draws. Then start bending until it works as a stick clip for most or all of your top biners. The way I bent it helps to support the bottom of the biner and hold it open if you wedge the gate into the end. The end of the wire is bent inwards a bit to hold the gate open. The loop helps to fasten it to the stick and to tie a string on so you don't lose the stick clip to an extra sticky biner. I fasten it to my long tent style pole with some velcro and an inner tube band. A thicker stiffer stick would help to make long clips, but I found the one I have and it can fold up into my backpack. It worked better before I loaned it to someone who forgot their tent poles. One nice thing about this method is you can bend the wire to clip bolts that are turned in weird orientations, and you can tighten or loosen it to suit different styles of carabiners.
 |
|---|
 |
|---|
No, I'm not going to pass along the Dalai Dirtbag secrets of booty gear retrieval.