written up june 09
 |
DO NOT SEW LOAD-BEARING EQUIPMENT. IF YOU DO, YOU OR SOMEONE ELSE WILL BE INJURED OR KILLED, PROPERTY WILL BE DESTROYED, AND IT WILL BE YOUR FAULT. BY ACCESSING THIS SITE, YOU ARE EXPLICITLY ACKNOWLEDGING THAT YOU HAVE READ AND UNDERSTOOD THE AUTHOR'S TERMS OF USE AND ARE AGREEING TO BE BOUND BY THEM. By reading this page or any pages related to sewing load bearing sewing hosted or linked to by this page you accept the disclaimer. If you would like to see or revisit the disclaimer click here. The information here is for information purposes only so as to inform you as you decide how to make your own prototypes and test them before use. IN NO EVENT WILL THE AUTHOR BE LIABLE FOR CONSEQUENTIAL, INDIRECT, INCIDENTAL, PUNITIVE, RELIANCE, EXEMPLARY OR SPECIAL DAMAGES ARISING OUT OF OR IN CONNECTION WITH THIS AGREEMENT OR USE OF INFORMATION. |
introduction
 this is the description, commentary, and other notes from my sewn stitching testing in january '08. i envision it being useful or interesting to folks similar to me, who are interested in making their own gear for various reasons- they're into design, prototyping, or they have hard-headed DIY issues. I know, and know of, climbers, parachutists, and sailors all working on these kinds of projects, but until recently had been unable to come up with any data, or even tasty hearsay, about what does and doesnt work with the kinds of load-bearing stitching a normal person with a normal sewing machine budget would be able to achieve.
It bears mentioning that this project is not likely to be useful to folks trying to save money, because if you value your time at all this is an extremely expensive way to go. sewn slings, cam reslings, custom alterations by real gear sewers, jump packs, sailing jacklines from west marine, etc, are dirt cheap compared to a burly sewing machine, burly thread, burly needles, some mistakes that need to be thrown out, a lot of planning, and the time to put it all together. this is also not going to be useful to anyone looking for lawsuit-proof (or death/injury-proof) safety margins, for obvious reasons.
 here's the disclaimer: i make no claims about anything whatsoever. if i appear to make a claim, dont take it seriously. you're completely on your own here, (which is probably how you like it if you're into this kind of thing). yes, im sewing strong stuff together, with the idea that one day i can sew stuff together that ill trust with my life. but im not completely there yet, and there are so many variables that there is no way that you can look through this stuff and come away with any secure notions about what will and wont work with your own setup. in what seems to be the amateur testing parlance, these are all 'quick-look' tests. no disciplined repetition. no statistical analysis. in the end, learn what you can from this, and then sew some of your own stuff, and then go break it, and if it checks out, then go drop test it, and if it still tests out, go wet it, freeze it, age it, leave it in the sun, sand it, and then drop test it again. and if it works then, you're way ahead of me.
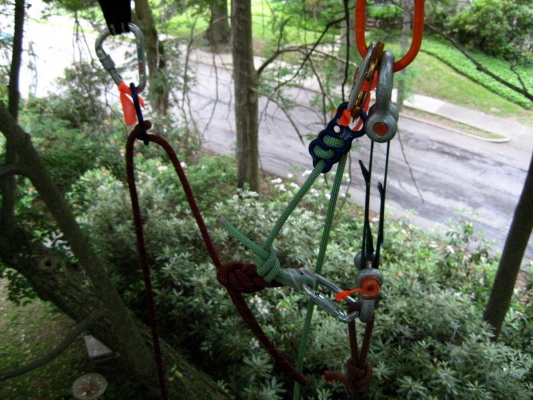
for my part, i tried a ton of things with the slow pull, and then to cap off project i did some drop testing (setup pictured here). not a thread broke, and the falls were horrendous, so i lost some motivation for the analysis given the empiric data seemed so promising. You can see the first drop video here (100 MB video; 155 lbs solid concrete weight factor two-ed onto a heavily back-tensioned 11" diameter tree branch, with a lot of shock-absorbing backups in case the sample failed. foreshortening makes the fall look a little gentler than it was. no samples failed, and it is hard to imagine a situation (using appropriate recreational rope systems) where you could generate this kind of load).
 its not in any particularly excellent order, so if youre really interested in taking away the full spectrum of lessons learned, read through this clumsy document, glance over the data spreadsheets and charts, and then read all the captions to the photos. thats an intial investment of at least an hour or two, but if you're operating at this level of geekiness it's probably worth it to you. unfortunately, to reduce typing, not every pearl is where it should be, so you really might need to read the whole kit and caboodle for full value. good rest day activity, maybe, for after you've already caught up on celebrity gossip and there are no new video clips on onion.com.
you're a smart cookie. youll figure it out.

 all the photos and a lot of videos are online too. most photos or videos have a brief synopsis of the most interesting tidbits, like breaking strength and any noteworthy trivia, or findings unique to that sample within the batch. i havent put even close to all the information that is in the main data bank in each photo. to correlate photos with tests, i have keyworded all the photos. so if, for instance, you are reading about the batch of samples J1, J2, J3, etc. if you go to the gallery website where all the photos are, and click 'search' and type in 'Jbatch', you should pull up all the relevant photos and videos. if you are looking for photos of the setups and jigs used to pull test them, the keyword is 'testjig'. droptested sample are 'droptest'. From the search results page, if you click on the first photo- on that individual photo page you will be able to see the caption/explanation, and there will be a 'forward arrow' button to see the next item in the search results.
If you want to search for an individual photo, say photo 2235, make sure the 'filename' option is clicked when you search.
| Let me repeat: if you want to suss the project out, click through the online gallery of photos. If the captions to the photos don't answer your question, see the master data chart. If you want to see more photos of the same sample, click the 'search' button in the gallery and type in the series name of that sample (ie: "L6") or the keyword of that sample (ie: 'Lbatch' for L series samples. the keyword is at the bottom of each caption as well). |
a few notes while i have your attention: first, if you have something to add, i really want to hear about it. you can find my contact information here. further, if you have questions, comments, criticism, something you think i should add or subtract or change, or personal experience or theory to share, i also really want to hear about it. this project is not complete, nor is its (amateur) analysis, so im all ears and will remain so until my fingers are too arthritic to jam splitter granite and/or work the sewing machine.
what i wanted to learn
well, i wanted to learn everything. however, as everyone who gets this spark soon learns: there is neither time nor money to tap it out. and i, having precious little of either of those two, focused on two main goals.
1. to get a decent idea of how much each stitch (defined as two strands, with a twist in the fabric to hold them together, as sewn by any old standard sewing machine) holds, so i could calculate the rough strength of a sewn tack based on number of stitches.
2. to try all sorts of other things to give myself a rough idea of what was obviously not going to work, to learn how things break under load, and to satisfy a few unanswered questions with trivial ramifications for actual prototyping.
to do all this, i sewed lots of slings and broke them. i also sewed a lot of accessory cords together as I had seen that done in specific climbing and parachuting settings. i will describe the process here, from start to finish, but feel free to skip most of this..
the sewing machine
first- the sewing. i have a 'portable industrial' machine, specifically the Sailrite LSZ-1. this machine is popular among offshore sailors, as it is powerful enough to do the majority of sail repair, has a zigzag stitch and a walking foot, but does not require a table mount and features a relatively small motor for an 'industrial' machine. this means that it is significantly more powerful than the average home machine, even an expensive one, and significantly less powerful than a standard industrial machine. power translates into the ability to shove a fat needle through two or three layers of webbing that are already extremely difficult to shove a needle through due to the amount of existing stitching binding everything together.
My machine is significantly more expensive than a walmart cheapo home sewing machine, and a little more expensive than a standard used table-mount industrial straight stitch machine, but a heck of a lot less than a true-industrial zigzag machine, and capable of sewing with fat threads that a home sewing machine just cant hack. size 69 is about as fat as ive ever had success with sewing with a home sewing machine, and many will even have trouble with that. there are generic knock-offs of the sailrite machine that save some money. i had one, but it broke twice in a month and i returned it, not before finding out how that is the par for the course with the knockoffs. ive never had trouble with the sailrite, and the company service is absolutely unbelievable, between their internet forums and their telephone service and their CDs and manuals. note: the price on this specific machine actually seems to have gone up a ways since i last checked a couple years ago..
the thread
The other distinct advantage of a semi-industrial machine is that it can accommodate very large needles. this mean you can sew with very large thread. I chose nylon, because I had been told it was good to match the thread material to the webbing material (no science to back this up). See this link to see the place i bought the thread from, and its long explanation of what threads are good for what, the linhanyl brand, industry-spec strength ratings for various threads, etc. Specifically, I chose Linhanyl brand 'natural' color nylon bonded, size 138. The company lists it as 22 lbs per strand rating. This thread size was an arbitrary compromise between number of stitches per tack, and size of the thread. The larger the thread you want to use, the larger the needle, and the harder it is to sew throguh dense material. I have seen load bearing tacks sewn with thread this size, but i should mention that sewn climbing slings usually use a heavier thread for bar tacks, seatbelts, jacklines, etc. I chose a name brand on the advice of the company (that web page link sums it up nicely, btw) so that i would get a reliable thread that should be similar if i buy another roll in ten years. I chose natural because I don't care what color the tacks are and the less bleaching and dyeing, the better. I sew this thread with a size 21 or 22 needle, which is pretty beefy, and requires a hefty bit of machine torque to shove it through the webbing. If you chose a far lighter thread, you could get away with a svelter needle (or even a home sewing machine) and just have to use a heck of a lot more stitches. I did do a few sample with lighter threads, in the J batch, so that i could tell if the results held for threads other than my standard linhanyl 138. see notes on this in the data explanations for the main data spreadsheet below. a data sheet with testing of the four different threads i use can be found here, however i do not trust the results currently as they do not match my gut feeling about how strong the thread is, and i havent been able to redo the testing, or evaluate the setup used for possible error source.
defining my sewing terminology so everything else makes sense..
if you want to follow the rest of this description carefully, and the photo captions, it will be helpful to understand my terminology. this is particularly important because i dont have any references and i may be using terms incorrectly.
i refer to two pieces of webbing joined together as a 'tack', or a 'seam'. each piece of webbing is referred to as a 'ply'. most tacks had two plies. the 'upper' ply is the piece of webbing that is on top during the sewing. the 'outside' or 'external face' of the upper ply is the uppermost face of the tack on the top ply. basically- what you are looking at when you are actively sewing. the 'inside' or 'internal face' of the upper ply is the inside face of the upper ply, which is squeezed against the inside face of the lower ply, and so on. this is technically of little use, except it can be interesting to note the way the threads broke in the photos and note which face you are looking at.
The 'long-axis' of the webbing is along the webbing, and the 'short-axis' is across. For instance, a 2 foot piece of 1" webbing measures 2 feet in the long axis, and only 1" in the short axis.
My stitching patterns were defined as follows: A 'bar tack' is overlapping zigzag stitches. A 'box' is literally just a square or rectangle of stitching. An 'X' was just that, usually with the points of the x originating from the points of the box. A 'diamond' was a diamond of stitching. A box and X and diamond tack meant a stitched rectangle, with an 'x' stitched throguh it, and a diamond on top of that. A 'rectilinear spiral' tack was when i didnt do any diagonal stitching. rather, i stitched once down the middle to hold the webbing together, and then stitched a box around the edges, and then stitched in an ever-decreasing rectilinear spiral until i got to the center of the tack. Sometimes i stitched back and forth, working across the tack. this was a 'rectilinear non-spiral'. Sometimes i just randomly stitched back and forth and back and forth on the long-axis. One important note that needs fleshing out is that before pretty much every single tack, i sewed the two pieces of webbing together with a stitch down the center of the long-axis. In the birthing throes of the project i found that this was necessary to make a tack symmetric. Because this was the first stitching of every tack, and at that point the webbing is pliable and doesn't resist thread-burying, and because its inline with the long-axis, this strand is sometimes buried in the webbing and barely visible, or completely invisible, but its still there. I also never mention it in the master data chart, so the tack patterns cited are misleading. for instance, a "box x diamond" pattern is actually a "line box x diamond" pattern with three long axis rows of stitching, two short axis rows, and four semi-long axis diagonals.
sewing basics
When sewing i tried to get even thread tension, burying the twist of each stitch in the middle of the plies. However, this never happened in practise. I was unable to get the top tension high enoguh to pull the bobbin thread up into the middle of the webbing plies. Generally, the top ply looked very good, because the twist was actually closer to the bottom of the plies and from the top everything looks buried. from the bottom, after the tack was done and off the machine, one could often see that the twist was very close to the bottom of the tack (the external face of the lower ply). this became more obvious in two circumstances: first, when the stitches were run diagonally across the webbing, or along the short-axis of the webbing. particularly in the ribbed style of weaving webbing, which is more common in 1" webbing these days, the threads of the webbing run predominantly in the long-axis, and stitches in the long axis tend to bury themselves deeper than they do in the short-axis, where they perch on top of the webbing. you can see this better in the heavy-stitch-density samples with the top and bottom views before breaking them.
The other thing that caused marked tension inadequacy (ie, the twist is far towards the bottom, or at times completely outside the plies) was when the stitch density was very heavy. Every time a line of stitches is put into the webbing, the webbing gets stiffer and stiffer, until it starts to feel like a board instead of the floppy pliable fabric you found so easy to sew. The closer you sew to an existing line of stitches, or if you are sewing between two existing lines of stitches, the harder it is for the needle to punch throguh, and the higher the top tension would have to be to yank the twist back into the plies. In my case, I just coudlnt get it that high without breaking threads and needles.
I feel slightly better about the offset twists because i regularly see name brand slings with complete twist asymmetry, where the entire twist is outside the plies. I see a lot of BD bartacks like this, and others too. I didn't do any testing to address this, but its possible that it doesn't matter much. I can even think of theoretical reasons why the stitch might be stronger with the twist outside the plies instead of inside them, but im mostly blowing hot air and theres no need repeating it.
For stitch patterns, i started with a box, x, diamond, double diamond pattern selection for the first batch, which were riffs on the designs i see in many industrial load bearing tacks using a straight stitch machine. tricam slings, sailing jacklines, and the webbing tacks on a lot of load-securing straps on trucks and whatnot often use a box with various diagonal stitching patterns inside. this was the only batch i used this pattern with because i found that it quickly tightened up the fabric to board-like consistency, and most stitches would sit on top of the webbing. I preferred my stitches to be buried a little, to make them less friction-prone, and rarely did samples with diagonal stitching after that first batch. to maximize long-axis parallel stitching i started doing most samples with teh rectilinear spiral. when i wanted the sample to be very strong but was in a hurry, i would just randomly back-and-forth it along the long axis a bunch of times. i would finish the stitch with four or five stitches backing over the last line of stitches, but in practise i doubt this matters much with the stitch density i was seeing in most of the tacks.
the testing setup
the first batch was sent to a distant test lab at a name-brand climbing rope maker. i pulled all my subsequent samples in a 10k lbs tensile tester in a basement physics department mech-e lab. supposedly it was calibrated, but who knows. most of the 1" webbing slings were pulled between the pins of huge shackles, carefully filed so as to take out imperfections in the pin. the pin radius was around 7/8" diameter. i did this to make the pin an unlikely failure point, as i preferred to find out how strong the stitching was. thinner webbing, or cord samples, were pulled over a ~.5" pin, also smooth. a handful of samples were pulled between kong steel modified D biners with a 10mm rope surface diameter, to mimic real-world loading. of course this is still a contrived 'real-world' situation, because i was pulling things at 2" a minute, a far cry from a drop-test.
tacks which failed at the webbing, instead of the stitching, had consistently good-looking tacks (ie, despite pinging the tack appeared to be in excellent shape, with no reason to believe the tack itself woudlnt hold the same load again). tacks which failed at the stitching showed no melting of the threads or webbing. in fact, if you pulled out all the thread bits and smoothed out the webbing, in almost all cases it would have no visible signs of ever having been used. for this reason i sometimes recycled broken tacks, and re-sewed and re-broke them. the genealogy of the slings is also noted in the master data sheet.
the 'pinging' phenomenon
during the pulling, there is one phenomenon that is critical to bring up here, as it is unclear what it is, and what it means, and how it should be addressed.
the samples very rarely just instantaneously blew with no warning. as a sample was loaded, usually at a high load it would start to 'ping', which was my onomatopoeic term for the sound the sample made as individual stitches blew, or possibly individual webbing fibers blew. sometimes you could see the threads blow. sometimes i coudlnt see it happening. (it is interesting to note, like in video 2249, for instance, that even a water knot shows a lot of pinging before failure). as the load increased, the pinging would increase, and finally the sample would blow. to appreciate this, it is best to watch some videos. the data about the beginning of the pinging is in the spreadsheets, and if that is important to you, look it up. it bears mentioning that the ping point recorded is fairly subjective. if there was an isolated ping and then a long period of silence i tried to discount it. i tried to record pinging points where pinging start and either continued, or started again within 5ish seconds. for my purposes i chose to discount the ping point and focus on the failure point, but this is not backed up by any real science.
the pinging originally seriously worried me, as i thought that at these loads the stitches were just ripping out and it made the testing unreliable. however, i tried a few samples where i hit the 'pinging' level, and kept it there for a while with no additional pinging. advanced the tested more (with more pinging) and held it, and nothing would happen, and then advance more, and so on. what this led me to believe is that the pinging was the outlier threads and fibers being broken as everything equalized, and that in all cases the vast majority of the stitches ended up taking the final load, and that even if something was pinging (ie, there was micro-failure in the tack) the overall actual strength of the tack was not compromised as those early pingers were never going to get to see the full load when the tack was seeing its highest load.
Further, the first stitch failures were generally in the same place- in the corners of the tacks, which makes sense to me as these are the places where the stitches are least backed up (equalized) with adjacent stitches. this makes me think that circular tacks would probably have minimal reduction in strength due to the 'missing' corner stitches.
my machine does not do a good job with bar-tacks, as repeatedly overlapping stitches compound the stiff-as-a-board problem, but i theorize that a bartack will be less likely to have pinging and just fail catastrophically at the side of the tack, as it has much more piled up stitching at edges.
 the First Batch (search for '1batch' in the gallery for photo/video)
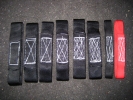
i sewed up eight short slings. six of new black 1" ribbed climb spec webbing, unknown mnfctr, and two excellent condition used thinner slings. samples 1 to 6 were increasing numbers of stitches, within a roughly similarly-sized box. this was the first test i did, and did not yet have lab access. they were pulled to failure by a name-brand company as a favor. i am not including the name and company (thoguh i am extremely thankful) as i do not know whether that info was intended to be known, and i dont want the kind fellow who hooked me up to be inundated with similar requests if he isn't ok with it..
samples 1 to 6 broke from 7.6 to 37.3 kn, all with stitching failure. the thin black and red slings broke at 23.2 and 22.7 kn respectively, at the webbing beside the tack.
all the data and a chart is here for this batch.
EVERYTHING ELSE
the rest of the webbing samples are lumped into one master spreadsheet, with a ton of data. i will give the briefest rundown of the types of samples tested, and then quickly summarize what each data column means.
click here to go to the gallery and see the photos and videos and associated notes. to see photos only of a specific batch, click on 'search' and then type in 'Abatch' for batch A, 'Bbatch' for batch B, etc.
batch A was a few slings with a lot of stitches using two types of webbing and a couple types of tacking to get an idea of how it was going to work out on the new tensile testing machine. batch B was a slew of slings using used (good condition) 5/8" webbing with varying numbers of stitches and a couple water knots for comparison. batch C was a misc set. the first is a botched sling that i thought id pull anyways for curiosity's sake. c2 is my first attempt at a belay loop design. c3 is intentionally sewn misaligned to exaggerate poor sling tacking to see if it makes a big difference. the d batch were slings with increasing numbers of stitches, in a standard pattern, in used good condition webbing. these best approximated what at this point i felt was likely to be my end design, and i was feeling out what kind of numbers i was getting. e batch was four more pieces of new webbing, trying to see if i was getting reproducible and acceptable numbers from my pattern. e4 was 5/8" webbing, and e 1-3 were 1" webbing with my standard pattern in new ribbed (the most common type these days) webbing. f batch tested two slings with pinched or folded ends (like screamers) to see if there was a significant reduction in sling strength. g batch were dogbone-type slings to see if that made a difference. H batch was another misc set. h1 was one half of a screamer kind of design, to test rip-stitching, one-strand loops, etc. h2 is sewn extremely cocked to even further exaggerate misaligned (or intentionally diagonal) tacks. h3 was a tack only sewn on one half of the webbing to see what very off-center stitching would do under load. I batch were belay loop tests. J batch were slings with threads that a home-sewing machine could handle (in fact several of them were sewn with the machine i sew clothing with), as well as another cocked sample and some other misc things. K batch slings had two tacks per loop and were drop-tested twice before pulling to failure. L batch slings used the original tack pattern seen in 1batch which seemed to hold higher loads per stitch and give more predictable breaking loads. M batch were slings sewn with the Lbatch tack pattern, but instead of a looped sling with a tack on one side, they are an inline (rabbit-runner style) to isolate the tack strength with no effects of friction and uneven loading.
the main data file is here.
data explanations (some omitted 'cause they're obvious):
- stitches (long axis). stitches in the long axis. self explanatory, i guess.
- stitches (diagonal, long axis). stitches that were on a diagonal, but more in the long-axis direction than the short-axis direction.
- thread. lin means 'linhanyl' brand. 138 is the size of the thread, like 92 or 69. see prior thread notes. gutterman is a brand name polyester thread sold in most fabric stores. it is a high quality thread for clothing, etc. it is most commonly seen in a light weight most folks think of as 'normal' thread. it is sometimes found in a heavier weight ('top-stitch' or 'button thread' or 'heavy duty') as well. the gutterman thread used in the J batch tests were the lightweight stuff, which is described as 'sew-all' or 'standard' in various websites. 'metrosene' is another brand of polyester thread some stores carry instead, and anecdotally has similar handling and strength characteristics.
- avg stitch length. i was stitching with a straight stitch, and i made a quick calculation of the distance from stitch twist to twist so that if it made a big difference i could figure out what was better. to this date, i havent done any calculations, and id be surprised if anything statistically useful woudl come out of this small sample.
- pattern. the stitching pattern of the tack. see prior notes.
- tension. the subjective symmetry of the upper and lower tension, and its effect on where the twist was buried within the plies. a lot of the slings say they were 'symmetric' but after breaking it was obvious that they may only have appeared that way from the outside. i dont know how much this tension symmetry matters yet.
- box dimensions. the outside dimensions of the tack box, in mm. i was curious if the same number of stitches were stronger if spread over a larger area or not. i have not done any calculations based on this yet.
- test jig. 'std' jig refers to the shackles, where the webbing is pulled over a ~7/8" pin. there is also the 1/2" pin, and the steel biners.
- pinging starts. see prior notes on pinging in "the testing setup".
- lbs per stitch sum calc. calculated lbs held per stitch at failure. this need clarification, as there is some wiggle room ( stitch counts were generally +/- a few stitches, and generally some peripheral stitches had blown prior to failure. it also needs mentioning that if the sling broke at the webbing then the calculation shows a lower number than probably woudl have held. i have yet to do calculations on whether higher numbers of stitches in the tack resulted in higher lbs per stitch, for a non-linear curve, but this should be done. it is very important.
- pinging at % failure. a calculation that states at what percentage of the ultimate failure load did the pinging start. i was curious about whether pinging was reliably starting at, say, 75% of the ultimate load, or anything like that. unforunately, the numbers are all over the place, which is unsurprising due to the various types of stitch patterns and subjective pinging recording method.
my first attempt at results is here: a chart with all the stitch count and breaking strength data from all representative samples. the spreadsheet can be downloaded here. however, the results are very unclear. my regression of pounds strength per stitch yielded 29#, and my averaging of stitch strength yielded 35#, and i dont know enough about what im doing to figure out why there is such a huge difference, and which method is correct, if either. im also not very motivated to look into it yet, but ill get around to it before i start sewing gear again. (if anyone wnated to attack this, feel free!! and then let me know!)
Another unresolved part of this results chart is that nothing is controlled for other variables that i am very interested in, such as stitch strength controlling for total number of stitches in tack. at a glance this doesnt seem to matter in this small sample.
I also did some drop testing, rigging an intricate system in a tree that closely replicated a free falling factor 2 with some harsh circumstances. 155 pound concrete weigh. multiple drops onto the same section of old fat rope (read: not much stretch), and the anchor heavily backtensioned to approximate a drop tower (pretty damn rigid). None of the dropped splices broke. In fact, there was no thread pinging, no evidence of damage, nothing that makes me think these tacks wouldn't hack it in the real world. And if they could pull these drops, then they can definitely handle harness/daisy duty where the loads are so much lower.
I'm still not saying you can take anything away from this, but it's pretty reassuring that I'm onto something good.
CORD SPLICE TESTING
i had seen nylon accessory cord spliced with sewing for pre-made prussik cord, and had seen parachute cord spliced with sewing in parachutes. i was interested in whether i could do the same thing with my own machine, so i tried it out as follows. it bears mentioning that the zigzag on my machine is a little wider than the zigzag on most any home machine ive seen, but that might not matter for the p-cord splicing.
 PARACHUTE CORD SPLICING (search gallery for "Pbatch")
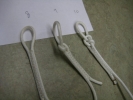
sample numbers reference photo taken before pull tests. tests 1 and 2 weren't done in favor of different knots. see later samples. splices were with 138 linhanyl natural nylon bonded. my wide zigzag on the industrial does not spread far enough to get all the way in to the middle or outside edges of the cord, so the splices concentrate on the inner junction. see photos. for the splices i either did one pass (sewed from one side of splice to other and then stopped) or two passes (sewed to end, then doubled back). sometimes i locked one or both ends of the stitch by doubling back for a short distance or sewing in place for a few stitches. this is denoted by 'seam locks'. see photos to estimate stitch density and count. 'no damage to stitching' implies no broken threads, nothing to make me believe the stitched splice would act any differently if pulled again. round turn and 2 half hitches is RT 2HH. two round turns and 3 half hitches is 2RT 3HH. etc. sometimes i tied a hitch or two inside the splice (theoretically to decrease load on stitches) as i had seen this in a parachute manual. all tests done at 2" per minute. cord is generic white pcord off a reel from tuolumne, new. presumably milspec. it was bought by the federal government from the standard fed sources. 7 core strands. each core strand has three sub-strands twisted into one. one strand has two tracer sub-strands. one orange/brown, one green. theoretically, you can track the manufacturer and rating from these tracers. data coding: sample number) first line is description of attachment at each end, with a slash in between failure notes 3) overhand / overhand sheath failure at knot at 320lbs, rapidly followed by core failure at lower load. 4) fig 8 / overhand fail at 391 at knot 5) overhand / 2-pass stitching 2" fail at 396 at knot. no damage to stitching. 6) overhand / 1-pass stitching 2" (no seam locks) fail at knot at 375. no stitch damage. 7) overhand / 1-pass stitching 2.5" (seam lock at loop end) fail at 366 at knot. no stitch damage. 8) RT 2HH / 2-pass stitching 2" ping at 340. fail at 433 at knot. no stitch damage. pin unsecured during test and spun, probably facilitating/increasing tail slippage. not a real-world situation. for all subsequent tests cord was pulled between kong steel biners to avoid pin spinning. 9) RT 2HH / 1-pass stitching 1.5" and a half hitch no failure. at 330 starting slipping slowly. maintained tension of 350-400lbs until 6" of tail had slipped through and then i stopped test. 9.2) RT 3HH / 1-pass stitching 1.5" and a half hitch **same sample as #9, except pulled to failure. fail at 463 at knot. notes: sheath fails first. if test is stopped quickly core strands may remain completely unbroken. in this case core strands were mostly broken. on removing sample it is apparent that the unbroken core strands were not secured by the stitching splice. ie: i could work the splice sheath back and forth over the remaining core strands. need to think about what this means. 10) RT 3HH / 1-pass stitching 1.5" and two half hitches fail at 506 at knot. 11) bowline / RT 3HH ping 300. fail at 348 at bowline 12) double bowline / RT 3HH ping 360 fail 377 at bowline (double bowline is starting bowline with a doubled loop instead of a single loop and feeding single strand in and out of it.) 13) RT 3HH / RT 3HH ping 460 fail 490 at sheath. 14) double bowline / RT 3HH ping 360 fail 375 at bowline. some knot slippage in this test. exact same setup and specs as sample 12. impressive reproducibility, or chance? 15) 2RT 3HH / 2RT 3HH ping 440 fail 450 at sheath. --- NOTES: -a round turn and two half hitches is not an appropriate knot for load bearing p-cord, at least on a slippery surface like a biner with a relatively large radius compared to p cord.. consistently slips quite a bit, and can fail completely. two round turns made a difference. three half hitches also helped. it is important to set and dress these knots. they really do travel! -double bowline seems a little stronger than single, but not enough to make a big difference. double bowline did hold a set though (once set coudl not be shaken free like a single bowline) and looked better subjectively while loading than single bowline. -no splices failed. in fact, no splices even had broken stitches. even though splices presumably did not anchor all core strands. these tests do not show how strong the splices are, but they do show that they are consistently stronger than normal p cord knots. half hitches or slipped girth hitches inline with splice (as seen in the parachute manual) seem unnecessary, but because not all core strands seem to be anchored with my splicing technique, they are probably still a good idea until i can work out a way to make splicing sewing secure all core strands. Ways of anchoring all core strands could include either splicing a much longer section of p-cord (if the core strands are twisting inside the sheath, this should work) or using multiple passes of stitching with offset, as seen on one of the 5mm splice samples. or i could knot it.. -single strand p-cord was consistently holding 300 lbs in a slow pull test. lowest ping at 300 lbs with a bowline. lowest failure at 320 with overhand knot. p cord sensitive to radius at knot. round turns break at obviously higher loads than overhands. -sheath always failed first. in fact, on some tests it was apparent that sheath had failed at or near the turn, and had pulled through the cinched outer half hitches leaving bare core strands down to the first turn. this makes sense as the first hitch is probably loaded much more than the others, and it is where the first bend in the strand is. FOR NEXT TIME: test loops of p-cord fisherman's (single and double) knots water knot test loops of p-cord pulled over a bad surface. for instance, bottom is pulled with biner. top is pulled over a sharp rock or square metal pin or threaded bolt. see how strength of sling changes when tensioned cord is over something unfriendly. determine splice strength. sew splices on both ends and see what they actually break at. determine waht it takes to anchor all core strands consistently.STERLING ACCESSORY CORD SPLICING (search the gallery for "5batch")
similar setup at p-cord test on same day. splices were placed over the 1/2" pin. bottom was cloved to kong steel biner. 2" per minute. 5mm sterling nylon. blue/black/magenta. apx rating is 1148 lbs from website data. all splice ends were burned to secure core stands. four samples pulled. 1) fail 910lbs. fail at clove. sheath still intact. kept pulling til failure- which was soon after at a much lower rating. ~.75" slippage at tail (+/- .5"). no stitch damage. 2) ping 750. fail 892 at core strands at clove entrance. sheath intact. i stopped test and cut open sample. core strands were completely severed and slightly welded where they entered clove. they pulled out of the sheath cleanly. ~.75" slippage at tail (+/- .25"). no stitch damage 3) ping 850. fail 868 of core at clove. .8" +/- .2" slippage at tail. no stitch damage. knot set hard by hand. i kept this sample. you can feel where the core has separated inside the strand where it entered the clove. 4) not a splice. one side is an overhand, the other a clove. ping 700. fail at 762 at core at overhand. .8" +/- .2" slippage at tail. knot set hard by hand. then pulled to failure. sheath broke at ~400 lbs at overhand. no core damage at clove hitch that i can pick up on (i checked). NOTES: -despite not being able to stitch evenly with a wide zig zag, these splices still held to high loads- beyond reasonable load bearing knots. samples one and two were two-pass (there and back stitching) and held up fine. 3 was 6-pass with offset to evenly cover material. however, this extra effort seems unnecessary. -5mm cord slipped quite a bit at clove over biner. even when set hard. need a few inches of tail, or even consider tying a backup knot. (like an overhand or fish knot in the tail, or use a three wrap clove, etc. -with this cord sheath apparently stretching much more than core. all initial failures were at core. this is different than p-cord. this may be due to design. this cord is constructed unusually: straight fibers in bundles. (p-cord is like a std kernmantle rope. core stands are twisted triplets.) failure loads are about what id expect. estimated 1148 lbs rating probably does not include a knot. FOR NEXT TIME: back to back splices to see max strength. splice into a loop---- next project: drop testing with a 155 lbs weight to actually see whether the stuff works. --- future things to test with a tensile tester: bar tacks home sewing machine tacks